How to convert your Gruntfile to npm scripts
In this post we’re going to take a quick look at npm scripts, and the thought process behind writing them. We’ll do this by taking Mozilla’s Makerstrap project and its Gruntfile and convert it to npm scripts to show us the benefits of npm scripts as a frontend build tool.
I should note before starting that there are many use cases for Grunt or Gulp, and npm scripts may not cover all of them. While it’s likely npm scripts can reduce your Grunt or Gulp files greatly, this post’s goal isn’t to diminish the usefulness of those task running services.
The goal of this post is to introduce another way that arguably has some simplification benefits. I ❤️ what Gulp and Grunt have done for frontend workflows—npm scripts is simply another option that we should consider.
Quick overview
If you already have a good understanding of npm scripts you can skip this overview.
If you’re less confident with npm scripts, all you really need to know is that it allows you to add tasks to your package.json’s scripts object. These tasks are run pretty much exactly like how you would run them through the command line.
What does a npm script look like? start: node server.js is a example of a simple script that allows a node server to start when you type npm start.
There are 3 main things you should know about npm script naming:
1) built-in script naming
npm has a list of ready-to-use npm script property names such as start, run, and test. In fact the command you likely use daily, npm install, is an npm script! You can run a script by running $ npm <name of script>.
2) pre and post script naming
When naming your scripts, you can add pre or post to tell npm to run them before or after. So if you have a start script, you could also write a prestart script that will run something before the start script runs.
3) custom script naming
If you’re like me, and want to be more 🐠expressive🐠, you can use your own script names. If for example we wanted to re-write that start command we could do so with getTheFluxCapacitorFluxingDoc: node server.js.
To run our custom named script we’d then run $ npm run getTheFluxCapacitorFluxingDoc, with run telling npm to run a non-standard named script.

Running multiple scripts
To run multiple scripts we can use syntax like npm run watch:* which looks for any watch:<asubtask> and runs them. This allows us to break use a script strucutre that represent smaller individual tasks, and then run them altogether.
Another popular way of running scripts is with npm-run-all module which allows us to use its --parallel argument to run scripts in parallel.
Just like on the command line, npm scripts also allows us to use && syntax to add additional commands to a script.
TLDR: Why do I use npm scripts?
- if you’re already using npm, you don’t need to install anything. No extra task runner to install
- no added abstraction of learning the ins and outs of Gulp and Grunt (that isn’t to say there aren’t some benefits to their abstraction too)
- in my experience the code and time spent writing npm scripts is considerably less!
- no more plugins
Let’s begin
We’re going to work through converting Makerstrap’s Gruntfile into npm scripts that will live in package.json. This should hopefully show that simplifying your build process isn’t too painful. Let’s take quick look at the Gruntfile:
module.exports = function(grunt) {
  require('time-grunt')(grunt);
  require('jit-grunt')(grunt, {
    shell: 'grunt-shell-spawn'
  });

  grunt.initConfig({
    pkg: grunt.file.readJSON('package.json'),
    less: {
      development: {
        files: {
          'demo/compiled/demo.dev.css': 'demo/less/demo.less'
        },
        options: {
          sourceMap: true
        }
      },
      build: {
        files: {
          'dist/makerstrap.min.css': 'less/build/makerstrap.less',
          'dist/makerstrap.complete.min.css':
          'less/build/makerstrap.complete.less',
          'demo/compiled/demo.css': 'demo/less/demo.less'
        },
        options: {
          compress: true
        }
      }
    },
    shell: {
      runServer: {
        options: {
          async: true
        },
        command: 'node demo/server.js'
      }
    },
    watch: {
      less: {
        files: ['less/**/*.less', 'demo/less/**/*.less'],
        tasks: ['less:development'],
        options: {
          spawn: false
        }
      }
    },
    copy: {
      latest: {
        expand: true,
        cwd: 'dist/',
        src: '**/*',
        dest: 'deploy/latest/'
      },
      version: {
        expand: true,
        cwd: 'dist/',
        src: '**/*',
        dest: 'deploy/v<%= pkg.version %>/'
      }
    },
    filesize: {
      base: {
        files: [
          {
            expand: true,
            cwd: 'dist/',
            src: ['*.css']
          }
        ]
      }
    }
  });

  grunt.registerTask('default', ['less:development', 'shell:runServer',
  'watch' ]);
  grunt.registerTask('stats', ['less:development', 'filesize']);
  grunt.registerTask('build', ['less:build', 'filesize']);
  grunt.registerTask('deploy', ['copy']);
};
So what’s under there anyways? Under wear?
To start our process of writing npm scripts, let’s start by breaking the Gruntfile into it’s different pieces. There are 4 registered tasks at the bottom of the Gruntfile:
- default (works with just running
grunt) - stats
- build
- deploy
We’ll use this structure for writing our npm scripts.
1) default task
These tasks would be typically run by running grunt, and were used as a way to get the necessary server and files going for development. The task is made up of three pieces that are wrapped together in a registerTask called default.
grunt.registerTask('default', ['less:development', 'shell:runServer', 'watch' ]);
a) less:development
Let’s first look at trying to rewrite the less:development part of the task as an npm script.
less: {
  development: {
    files: {
      'demo/compiled/demo.dev.css': 'demo/less/demo.less'
    },
    options: {
      sourceMap: true
    }
  },
},
In the Gruntfile we used 'demo/compiled/demo.dev.css': 'demo/less/demo.less' to compile demo.less to demo.dev.css and place it in a compiled directory.
We can use the great autoless module to help us compile our .less file. While autoless does have a watch feature we don’t need that here because we just want the compile feature.
autoless doesn’t let’s you specify a specific file, so we can just give it the demo/less/ directory as a source, and demo/compiled/ as the output point for the compiled .css file.
Here’s what the above Gruntfile code looks like as an npm script:
"less-dev": "autoless --source-map --no-watch demo/less/ demo/compiled/"b) watch
Our next ~task~ to recreate as a script is a watch task:
watch: {
  less: {
    files: ['less/**/*.less', 'demo/less/**/*.less'],
    tasks: ['less:development'],
    options: {
      spawn: false
    }
  }
},
The above code watches a set of .less files and runs the less:development compile task when it sees a change.
We can use autoless here again. We’ll also give it the general directory name:
"watch:demo": "autoless --source-map demo/less/ && npm run less-dev",
"watch:base": "autoless --source-map less/ && npm run less-dev"
c) shell:runServer
Finally, we need to look at adding a short script to replace this command.
shell: {
  runServer: {
    options: {
      async: true
    },
    command: 'node demo/server.js'
  }
},
This Grunt task can be summed up very nicely like so:
"server": "node demo/server.js"
Note: server is one of npm’s reserved properties.
2) stats task
For the stats task we’ll need to write a script that checks the filesize. We already have the less:dev task completed above.
grunt.registerTask('stats', ['less:development', 'filesize']);
a) filesize
filesize: {
  base: {
    files: [
      {
        expand: true,
        cwd: 'dist/',
        src: ['*.css']
      }
    ]
  }
}
The above code outputs the following when $ grunt stats is run:
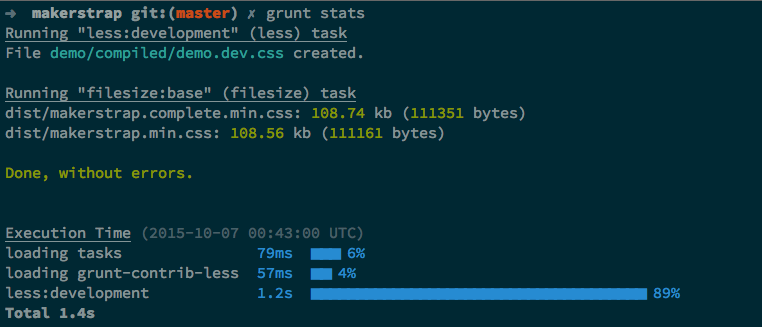
It returns the size makerstrap.complete.min.css and makerstrap.min.css, it also tells us how long it took for the task to run.
For the purpose of this post, we’ll skip trying to output nice charts, and focus just on returning the file sizes.
I couldn’t find an alternative to the Grunt filesize plugin, but it’s a very simple feature to recreate. Just create a tiny filesize.js module and use fs.stat to return the filesize values.
var fs = require('fs');
var path = process.argv[2];
var cli = require('cli-color');
fs.stat(path, function(error, stats) {
console.log(path + ': ' + cli.green(Math.floor(stats.size/1024) + 'kb'));
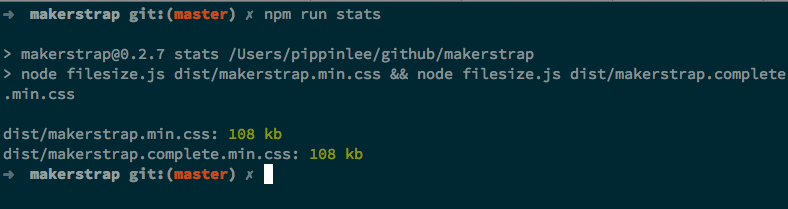
});Because npm scripts allows us to run a node command from the script, we can use filesize.js like so to return the filesizes:
stats: node filesize.js makerstrap.complete.min.js && node filesize.js makerstrap.min.js
which outputs something very similar to the grunt plug-in.
3) build task
We’ve already written a filesize script, so we’ll just focus on less:build.
grunt.registerTask('build', ['less:build', 'filesize']);
a) less:build
build: {
  files: {
    'dist/makerstrap.min.css': 'less/build/makerstrap.less',
    'dist/makerstrap.complete.min.css': 'less/build/makerstrap.complete.less',
      'demo/compiled/demo.css': 'demo/less/demo.less'
  },
  options: {
    compress: true
  }
}
The above code builds our Makerstrap app readying it for deployment.
It creates dist/makerstrap.min.css, dist/makerstrap.complete.min.css, and demo/compiled/demo.css from their respective .less files.
- less/build/makerstrap.less -> dist/makerstrap.min.css
- less/build/makerstrap.complete.less -> dist/makerstrap.complete.min.css
- demo/less/demo.less -> demo/compiled/demo.css
To accomplish this, we can re-use our less-dev task and combine it with another autoless command to handle the two build/ files. Altogether our npm script for the build task would look something like this:
npm run less-dev && autoless --source-map --no-watch less/build/ dist/
4) deploy
Now, we can write the script for the final Grunt task:
grunt.registerTask('deploy', ['copy']);
a) copy
copy: {
  latest: {
    expand: true,
    cwd: 'dist/',
    src: '**/*',
    dest: 'deploy/latest/'
  },
  version: {
    expand: true,
    cwd: 'dist/',
    src: '**/*',
    dest: 'deploy/v<%= pkg.version %>/'
  }
},
copy:latest creates a directory called latest in /dist and adds a build version of your app.
copy:version creates a directory called version in /dist and adds a build version of Makerstrap’s css files.
We can use the great cpx module to copy files to /dist like so:
"build:deploy": "npm run build:copy && build:version",
"build:copy": "cpx \"**/*\" deploy/latest/",
"build:version": "cpx \"dist/**/*\" deploy/pkg-version/",
Wrap up
So if we take all of our newly written npm scripts, we should have something that looks like this:
"scripts": {
  "start": "npm-run-all --parallel server watch:*",
  "less-dev": "autoless --source-map --no-watch demo/less/ demo/compiled/",
  "watch:demo": "autoless --source-map demo/less/ && npm run less-dev",
  "watch:base": "autoless --source-map less/ && npm run less-dev",
  "build": "npm run less-dev && autoless --source-map --no-watch less/build dist/",
  "build:deploy": "npm run build:copy && build:version",
  "build:copy": "cpx \"**/*\" deploy/latest/",
  "build:version": "cpx \"dist/**/*\" deploy/pkg-version/",
  "server": "node demo/server.js",
  "postinstall": "bower install"
}
For ease I’ve used the npm-run-all module to be able to run the server and watch tasks in parallel when I run npm start.
All told, that wasn’t too painless, and should hopefully be easier to handle as your app and frontend pieces evolve.
I’d love to know about any errors or clarifications needed in this post, so please do tweet me, or email me: pippin@pippinlee.com.
Here’ the final version of Makerstrap done using npm scripts: github.com/pippinlee/makerstrap
Additional information
- Substack on “npm run”
- Kate Hudson’s “advanced front-end automation with npm” talk
- npm’s great docs on “run-script”
- Please do be careful if you include the
getTheFluxCapacitorFluxingDoccommand in your npm script, I can’t tell you how often I’ve forgotten to include anendscript to cool and shut it down and then ended up back at Alamos with Feynman.